This isn’t our usual topic, but I’ve gotten a lot of questions about my efforts so here are all the answers I could think of. I have more photos than these, but I’m out of time/motivation for the post. Maybe I’ll circle back next week.
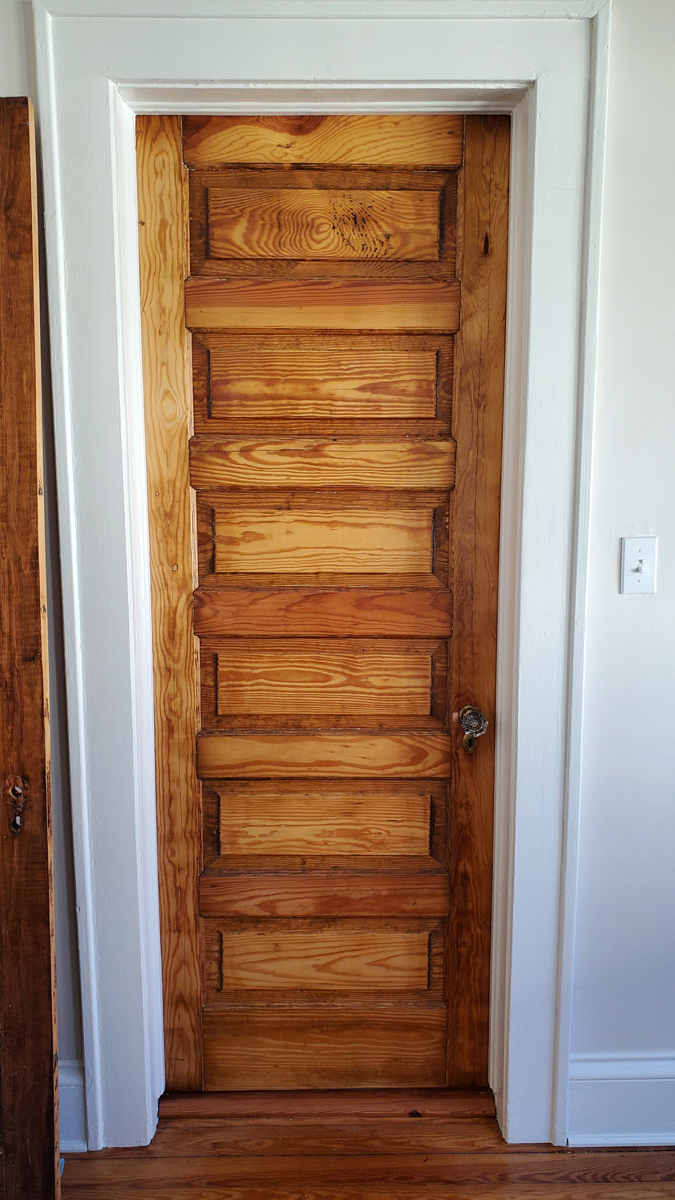
For the last few years, I’ve been restoring the doors in a 1920s Craftsman bungalow.
Ours happen to be six panel doors in heart pine, but these steps likely apply to a variety of styles and materials. I’m only speaking from my experience. I am NOT a professional carpenter or restorer.
Step 0: Ask yourself if you really want to get involved in this to begin with. It takes hours of work and involves using a heat gun, a variety of chemicals, and power tools (not all at once.) As I neared the end of the 11th and final door, a friend said I should go into business. We did some math and figured out I’d have to charge about $1,000 per side and crank out two doors a week to make this a worthwhile endeavor. Even if I could get that many clients, I wouldn’t do it. Though it is somewhat satisfying, and the results are fantastic, it is a lot of manual labor.
Seriously, if the doors will hold paint just paint them.
Our problem is that no matter how many layers of any type of primer plus latex, the paint would crack in a strange way, pulling apart to reveal lines of wood below. Eventually, I figured out that below the many layers of likely different types of paint put on through a century was a layer of shellac. I do not know the scientific reason why paint on top of this combination just wouldn’t work, I only know that we wasted a lot of hours painting over and over, only to have it crack again after a few days. Eventually, I learned paint would only adhere properly if these surfaces were stripped down to the bare wood, at least as much as we could get off.
- No, sanding does not work. The heat from the friction of the sanding turns shellac into goo, which immediately gums up the sandpaper.
- Yes, I’ve heard you can get doors “dipped.” I couldn’t find a place that does it, and I was told by one restoration person that the results aren’t as pretty. “It turns the wood a little gray.” I did find one guy that would restore the doors, but only in batches of ten – by which point I’d already stripped several myself.
- No, I don’t need your advice, help, a reference, etc. I’m done stripping doors, at least for a while.
- No, I will not strip your doors.
To Restore Enough to Paint:
- If you want it to look like new, and painted, just rip the old doors/trim out and replace them with new. Forget trying to save them. They’re never, ever going to look new again.
- If you want to strip it bare and just seal it for a natural wood look, jump down to the section on “To Strip for a Bare or Natural Look” and follow those steps.
- If you want to just paint over it, and don’t mind a bit of historic character, follow the steps below.
Step 1: Get a new, sharp scraper and scrape off as much as you can. Some of the paint layers pop off easily. Some don’t. You want to get down to the wood as much as possible because you want to get the shellac off, the translucent, candy-like coating. I left a lot of paint in corners or places that were just too stubborn to get off without putting dents in the trim. Old, heart pine is a lot harder than modern, white pine, but you can still gouge it with a scraper.
Step 2: Get a gallon of denatured alcohol. Our local big box hardware store only sold it in smaller cans, but after going through several I finally trekked over to a proper paint store and started buying by the gallon. It is super thin and runny, so you’re going to drip. Put down waterproof drop cloths if you care about what it is going to drip on. Get some of those 3M scrubby pads. Again, buy in bulk. Get some rags. Old t-shirts work. The rags will be so gummed up as to be uncleanable, so you’ll need a lot more than you expect.
Wear rubber gloves and eye protection. I’m sure you’re not supposed to breathe this stuff either, but I don’t know what type of protection to use for alcohol fumes. I just made sure to open all the windows and put fans in to pull air through the house.
Soak a rag in the alcohol and rub it on the shellac. You want a lot of liquid on there. Wait a few seconds. The shellac will re-liquify. You can scrub a lot of it off with the 3M pads and rags. The wood will look a lot lighter. Do not let the alcohol sit too long, as it will just evaporate and then the shellac hardens again. Leaving it to soak does nothing but waste alcohol.
Step 3: Let that dry. Sand the edges of any paint you didn’t manage to get off, if you want slightly smoother results.
Step 4: Use a shellac-based primer. It’s runny and messy to work with. It looks like crap at first. But it adheres to any shellac left behind, and other paint will adhere to it. I used Zinsser BIN shellac primer, the only thing I found that would cover, and be covered.
Step 5: Paint.
Step 6: Accept the shabby chic look.
To Strip for Bare or Natural Look:
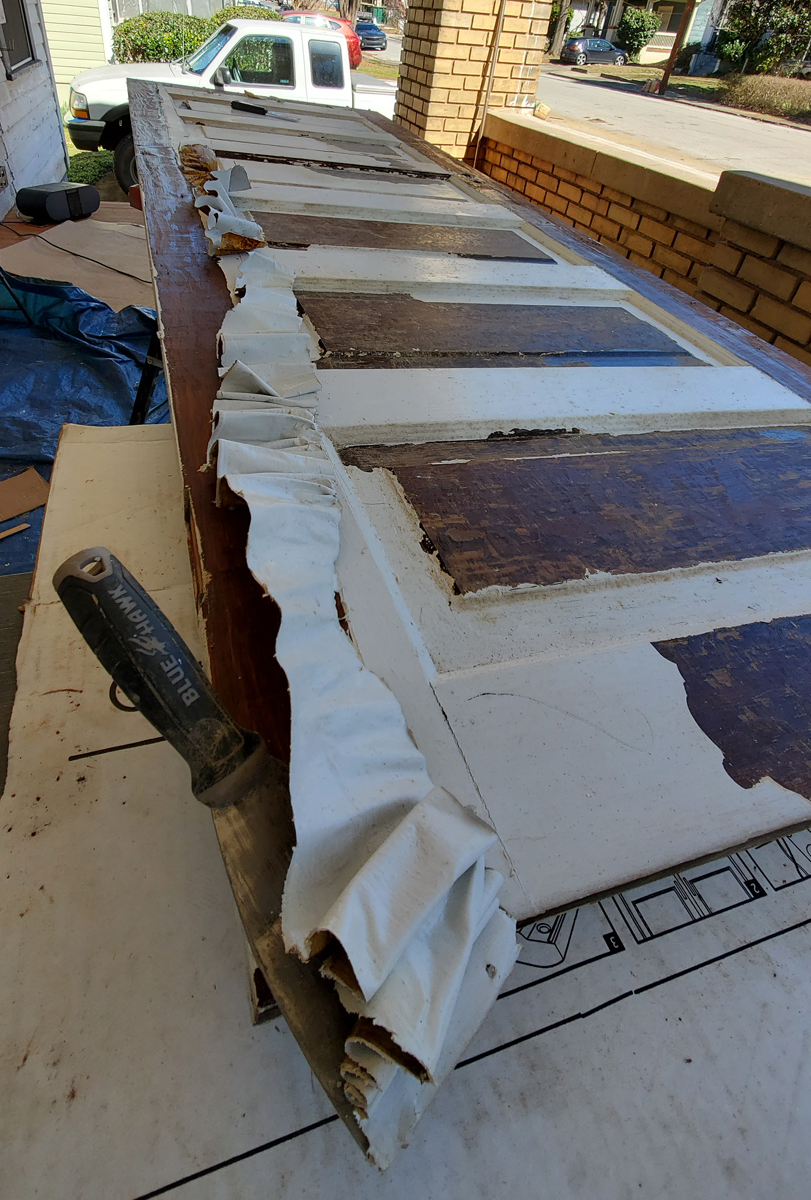
Step 1: Remove the boards/trim and find a flat, stable working surface with good ventilation.
Step 2: Scrape off any loose stuff. Don’t worry about it too much because I’ve found the heat gun in the next step decreases the amount of elbow grease you’ll need.
Step 3: Get a wide, metal scraper, like 3”. Get a heat gun. You might want to wear gloves. Leather gardening/work gloves would do the job (you’re not handling a lot of chemicals in this step.) I’m sure I’m supposed to tell you to wear eye and breathing protection. Regardless, the smell of melting paint and shellac isn’t pleasant, and the heat from the heat gun gets tiresome, so a fan blowing the heat and fumes away is a very nice to have.
If you have 100 years of layers of paint on stop of shellac, you may want to turn the heat gun up a notch from its default. Point the heat gun at the surface, about an inch or two away, at a slight angle so that the gun’s air blows away from you. Wave it back and forth. After a few seconds, you’ll see the paint bubble up. If you have bare shellac anywhere, you’ll see it start to liquify. Start scraping and slowly moving the gun down the surface. Even if there are several layers of pain, the heat gun liquifies the shellac underneath (if it is there) and the paint lifts off pretty easily, particularly as the end of the metal scraper begins to heat up.
If there is no shellac underneath, the scraping is a bit more difficult. I found our bathroom and kitchen doors had no shellac underneath the paint. After the heat gun, I used Citrustrip to get the paint off. Follow the directions, but also wrap the entire thing in trash bags or plastic wrap so that it doesn’t dry before you’re ready to scrape it off. You can even leave that overnight to soak. However, in 2023, I learned that Citrustrip recently changed their formula and it is far less effective. I am sure there are better chemical strippers out there!
Step 4: Get a gallon of denatured alcohol. Our local big box hardware store only sold it in smaller cans, but after going through several I finally trekked over to a proper paint store and started buying by the gallon. This stuff is super thin and runny, so you’re going to drip. Put down waterproof drop cloths if you care about what it is going to drip on. Get some of those 3M scrubby pads. Again, buy in bulk. Get some rags. Old t-shirts work. The rags will be so gummed up as to be uncleanable, so you’ll need a lot more than you expect.
Wear rubber gloves and eye protection. I’m sure you’re not supposed to breathe this stuff either, but I don’t know what type of protection you’d need for alcohol fumes. I just made sure to work outdoors, or open all the windows and put fans in to pull air through the house.
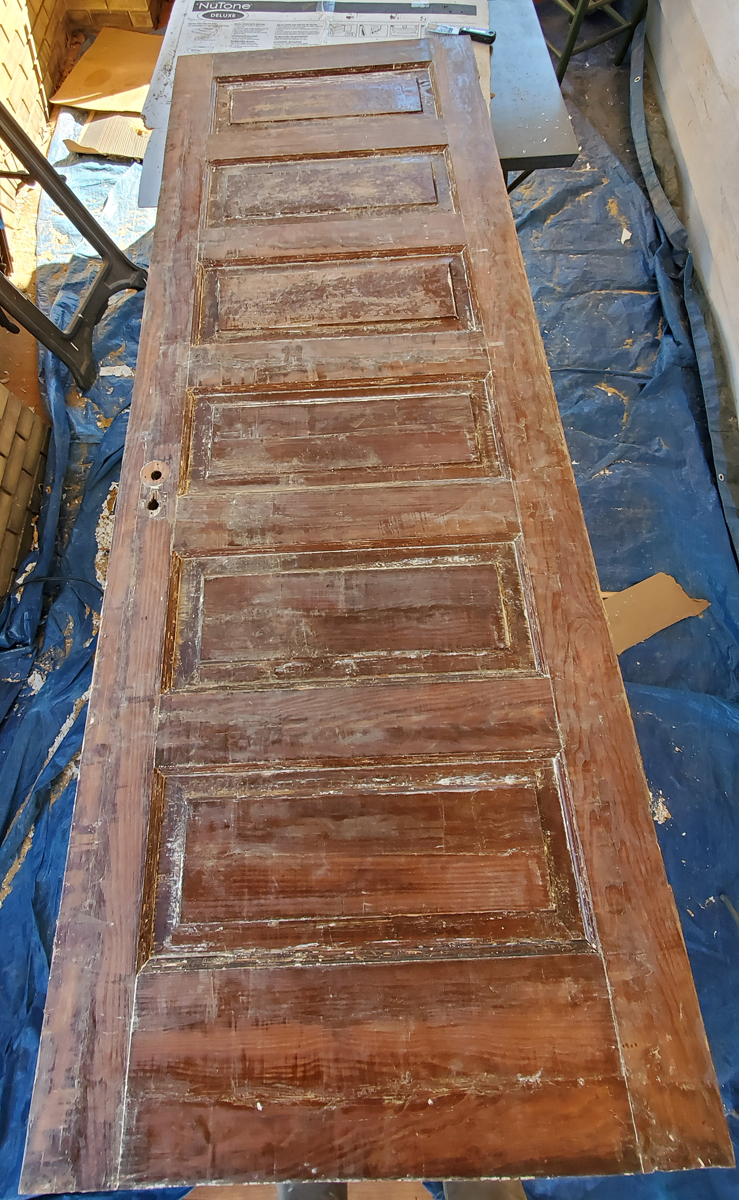
If you have the trim or door loose, you can lay it flat and splash the alcohol directly onto the surface. You want a lot of liquid on there. Wait a few seconds. The shellac will re-liquify. You can scrub a lot of it off with the 3M pads and rags. The wood will look a lot lighter. Do not let the alcohol sit too long, as it will just evaporate and then the shellac hardens again. Leaving it to soak does nothing but waste alcohol.
Some doors have intricate little indents and such that are a real bear to get into, but you want to get as much shellac off as possible.
You’ll notice some watermark-sorta stains left behind. That’s ok. We’ll be sanding those off soon.
Step 5: I went back with the heat gun to get at stuff that I couldn’t get off with the alcohol. It was quick and totally worth the time.
However, I did not get off every molecule of paint. There were nail holes and other dings in our doors that, even after sanding, were still there. I’ve heard people say, “I’m going to get some dental tools and really clean this door to perfection.” I have not heard anyone say they’d actually done it, however, and every house with restored doors and trim that I’ve seen still has evidence of its history.
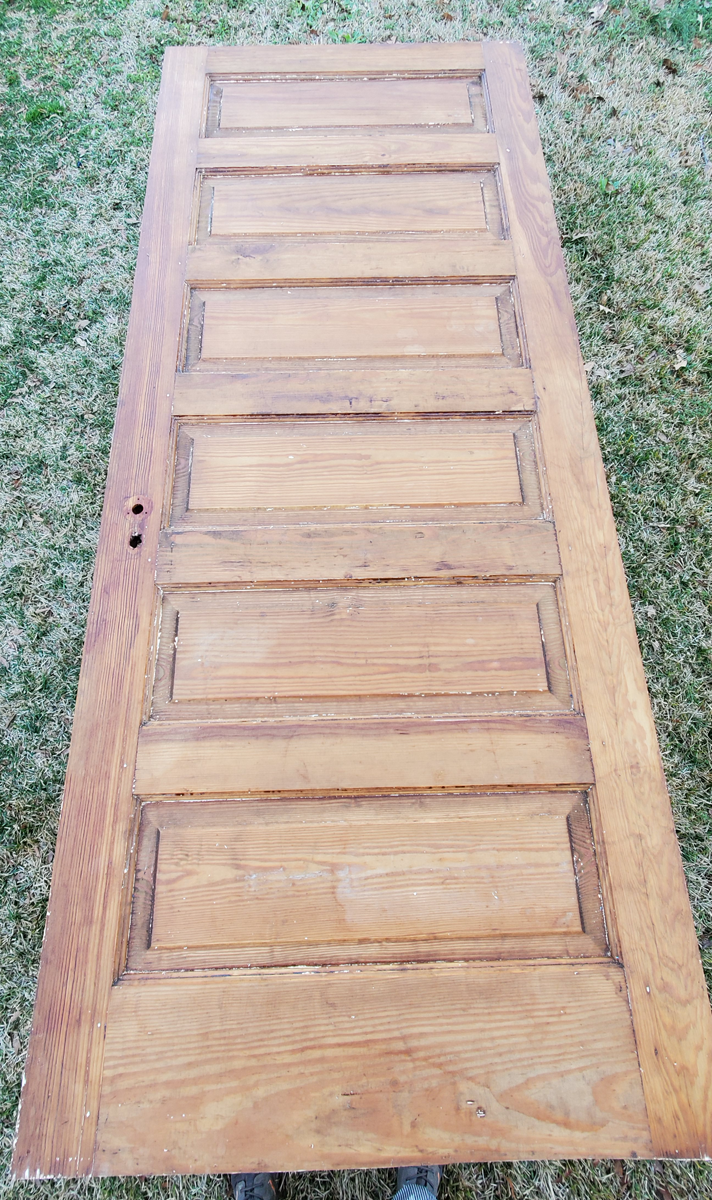
Step 6: Get a 4” belt sander. No, not an orbital sander. No, not one of those little triangle sanders. A belt sander can be used to go in the direction of the grain. Other sanders don’t, so they leave a sort of blurry finish. Get a bunch of 120 grit belts – I ordered 10 at a time online and went through a couple of belts per door side. I was told by a floor restorer that you don’t want to go too fine with the sandpaper because it polishes the surface to the point where it won’t absorb finish.
Again, use breathing and eye protection. Gloves aren’t advised with some power tools, as they can get caught and pull your hand in. Bare hands are actually safer with some tools. I don’t know if that’s the case with the belt sander, but I didn’t wear gloves and haven’t lost any fingers (yet.)
Use the belt sander in the direction of the grain. Start on the short, horizontal sections. You’ll find that the sander has a shorter surface that actually sands than the actual length of the sander. There is a pad that presses the belt down, then a roller on either end. Only that area under the pad works well. You can tilt the sander and use the area on the roller, but you will gouge the wood.
You’ll have to overlap the tall, vertical sides of the door as you work on the short, horizontal sections. That’s ok, because when you’re done with all the horizontal sections you’ll go back and do the vertical ones and you can control where the sides of the sander land and sand off the marks you made.
Don’t forget the left and right edges of the doors.
I didn’t do the tops and bottoms because A) they’re not visible, B) there are two kinds of grain on those ends and the sander doesn’t like it. Instead, I used the top and bottom to write in permamarker what door went where.
In the end, I was happy with 120 grit once I sealed it, so I didn’t go finer. As mentioned, I was warned against going finer anyway.
However, the more you sand, the more work you’re going to put into making the hinges, door handle and lock fit properly, and the larger the gap around the edges of your door is going to be. Sand as little as possible.
Step 7: Clean up anything you have patience for with a scraper and/or hand-sanding (in the direction of the grain if you can.)
Step 8: Patch holes. I used two-part epoxy putty and then various markers to color the patches as close as I could to the color of the door.
Step 9: Test fit your hardware.
If your hardware is gunked up with paint, you can soak it in Simple Green overnight and the paint will peel right off. You can polish brass with various products. I just used a wire wheel on a drill or grinder and then rubbed a bit of oil on top. The results don’t look polished, they look antique.
If you’ve sanded too much, you may find that the hinges, door handle and lock don’t fit as perfectly as before. Either just live with it sticking out slightly, or do some carpentry.
Step 10: Seal. I used oil-based polyurethane on our doors. It gives the wood a nice, rich, golden tone and is what was used by the floor refinisher on the floors, so everything matches nicely. The first coat is a “sealer” with two parts poly and one part mineral spirits. Use a natural hair brush. There are lots of videos and instructions out there on using polyurethane.
Step 11: Mount the door(s)/trim and prepare for endless comments about how gorgeous they are.